> ## Documentation Index
> Fetch the complete documentation index at: https://docs.directenergypartners.com/llms.txt
> Use this file to discover all available pages before exploring further.
# Login
This section explains how to log in to the controller’s Web-Based Management (WBM) interface. From the WBM, you can configure network settings, update admin credentials,
and install the required applications. Follow the steps below to get started.
### Connect Laptop
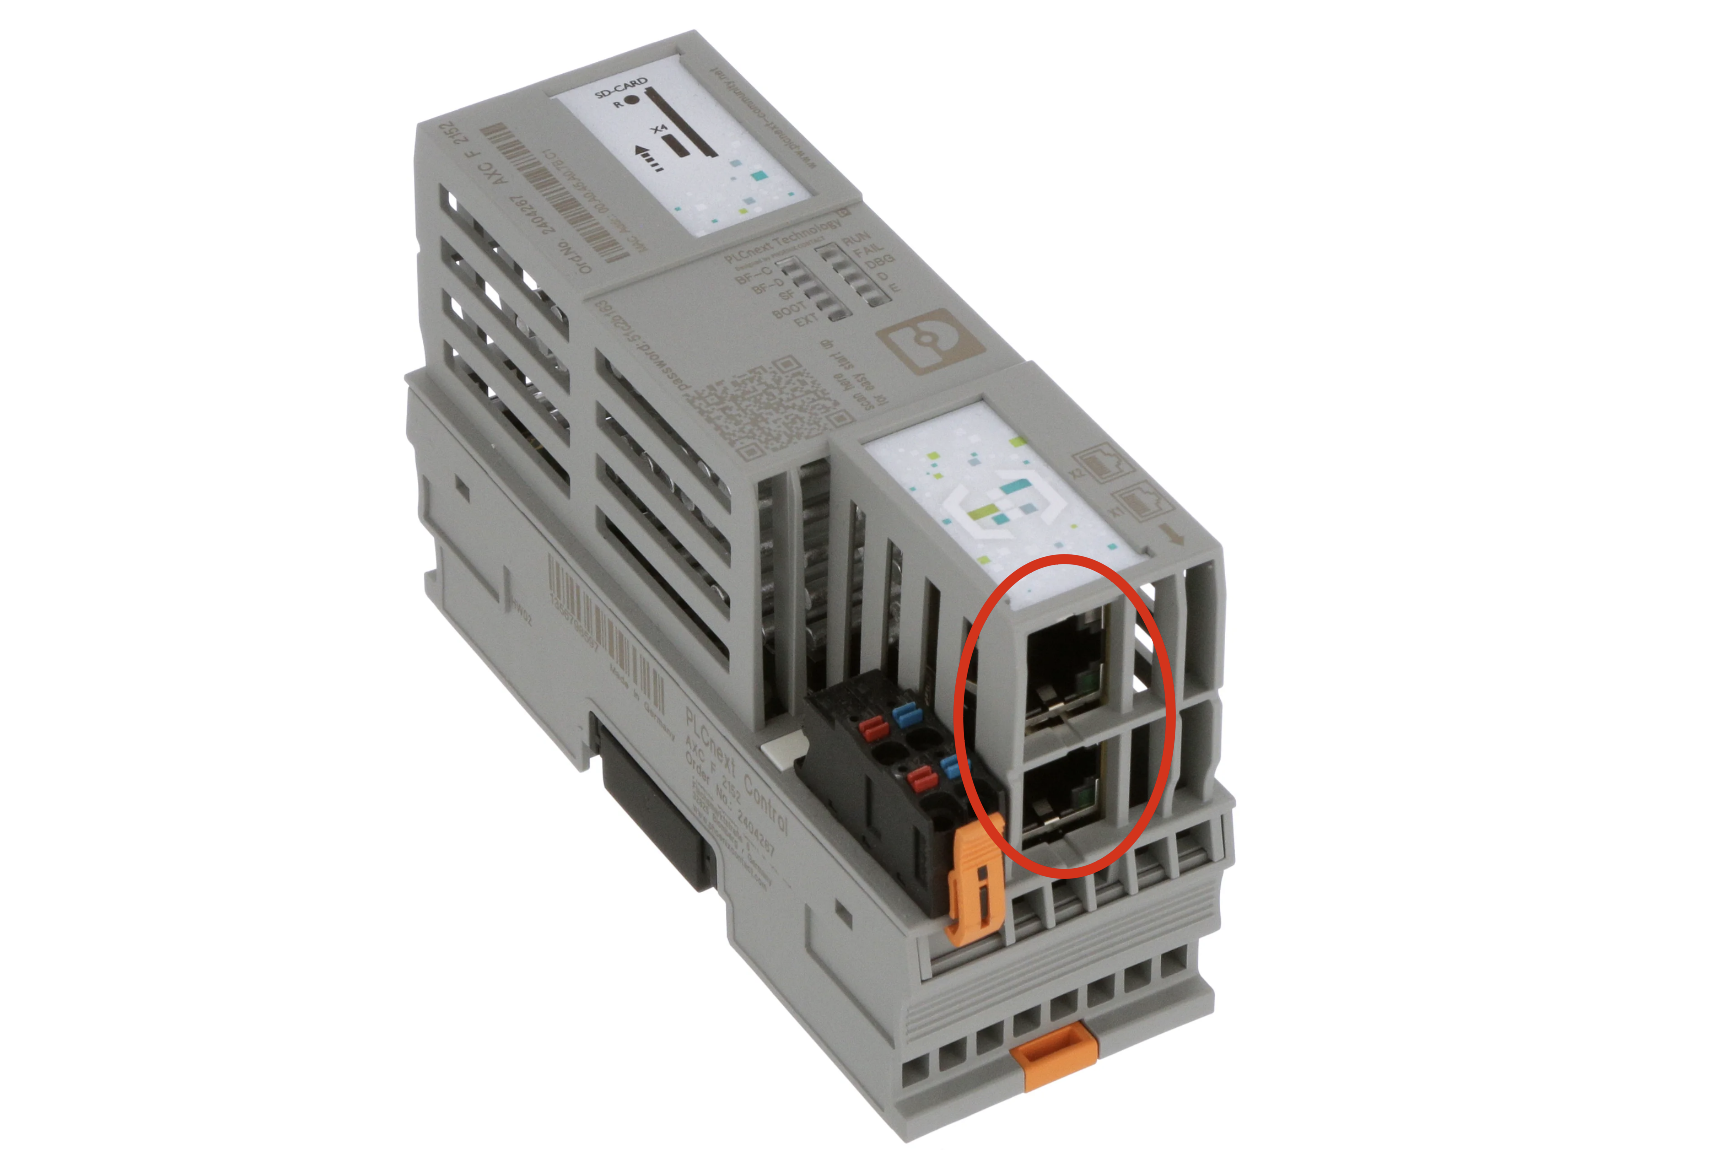
Use an Ethernet cable to connect your laptop directly to the Power Platform controller. The connection method varies depending on your Power Platform version:
* **Power Platform Controller:** Connect your laptop directly to the Power Platform controller using any of the two Ethernet ports located at the bottom of the controller.
 * **Power Platform Panel:** Connect your laptop to the Ethernet connection port at the bottom of the panel. This port is directly connected to the network switch inside the Power Platform panel.
### Setup Laptop
Set your laptop to the same IP range as the Power Platform controller. This is required to access the Power Platform controller's Web-Based Management (WBM) interface.
The default IP address of the Power Platform controller is `192.168.1.10`.
Temporarily change your laptop's IP settings to be in the same range as the controller’s IP address. To do this, open the network settings on your
laptop and either change or add a new static IP address, subnet mask, and gateway. For example:
* **IP address:** `192.168.1.5`
* **Subnet mask:** `255.255.255.0`
* **Default gateway:** `192.168.1.1`
Below is explained how to change or add the network settings for Windows and Mac.
Right-click on the desired network connection and select **Properties**.
* **Power Platform Panel:** Connect your laptop to the Ethernet connection port at the bottom of the panel. This port is directly connected to the network switch inside the Power Platform panel.
### Setup Laptop
Set your laptop to the same IP range as the Power Platform controller. This is required to access the Power Platform controller's Web-Based Management (WBM) interface.
The default IP address of the Power Platform controller is `192.168.1.10`.
Temporarily change your laptop's IP settings to be in the same range as the controller’s IP address. To do this, open the network settings on your
laptop and either change or add a new static IP address, subnet mask, and gateway. For example:
* **IP address:** `192.168.1.5`
* **Subnet mask:** `255.255.255.0`
* **Default gateway:** `192.168.1.1`
Below is explained how to change or add the network settings for Windows and Mac.
Right-click on the desired network connection and select **Properties**.
 In the pop-up window, select **Internet Protocol Version 4 (TCP/IPv4)** and click on **Properties**.

 In the next window, add the **IP address** with the **subnet mask** and add a **default gateway** as stated above.
 After adding the IP address with the subnet mask and the default gateway, click **OK** to save the settings.
Click on the **Apple** menu in the top-left corner of your screen.
Select **System Settings** from the drop-down menu.
In the **System Settings** window, scroll down and click on **Network** in the sidebar.
On the right side, you will see a list of network interfaces (such as Wi-Fi, Ethernet, etc.).
Select the interface you want to configure (e.g., **Wi-Fi** or **Ethernet**).
After selecting the network interface, click on the **Details...** button.
* If you are using macOS Ventura or later: After selecting the network interface, you will see a list of available networks. Scroll down and select **TCP/IP**.
* In the **Configure IPv4** drop-down menu, select **Manually**.
* Add the **IP address,** **subnet mask** and **default gateway** as stated above.
Once all the details have been entered, click **OK** to save the settings.
### Login to the WBM
Open a web browser and enter `192.168.1.10/wbm` or click on this [link](https://192.168.1.10/wbm).
If prompted with a security warning stating ‘**Your connection is not private**’, click on **Advanced** and then click on **Proceed to 192.168.1.10 (unsafe)**.
After adding the IP address with the subnet mask and the default gateway, click **OK** to save the settings.
Click on the **Apple** menu in the top-left corner of your screen.
Select **System Settings** from the drop-down menu.
In the **System Settings** window, scroll down and click on **Network** in the sidebar.
On the right side, you will see a list of network interfaces (such as Wi-Fi, Ethernet, etc.).
Select the interface you want to configure (e.g., **Wi-Fi** or **Ethernet**).
After selecting the network interface, click on the **Details...** button.
* If you are using macOS Ventura or later: After selecting the network interface, you will see a list of available networks. Scroll down and select **TCP/IP**.
* In the **Configure IPv4** drop-down menu, select **Manually**.
* Add the **IP address,** **subnet mask** and **default gateway** as stated above.
Once all the details have been entered, click **OK** to save the settings.
### Login to the WBM
Open a web browser and enter `192.168.1.10/wbm` or click on this [link](https://192.168.1.10/wbm).
If prompted with a security warning stating ‘**Your connection is not private**’, click on **Advanced** and then click on **Proceed to 192.168.1.10 (unsafe)**.
 Log in using the credentials provided to you by DEP:
* Username: `admin`
* Password: `[printed on the housing of the controller]`
Log in using the credentials provided to you by DEP:
* Username: `admin`
* Password: `[printed on the housing of the controller]`
