How It Works
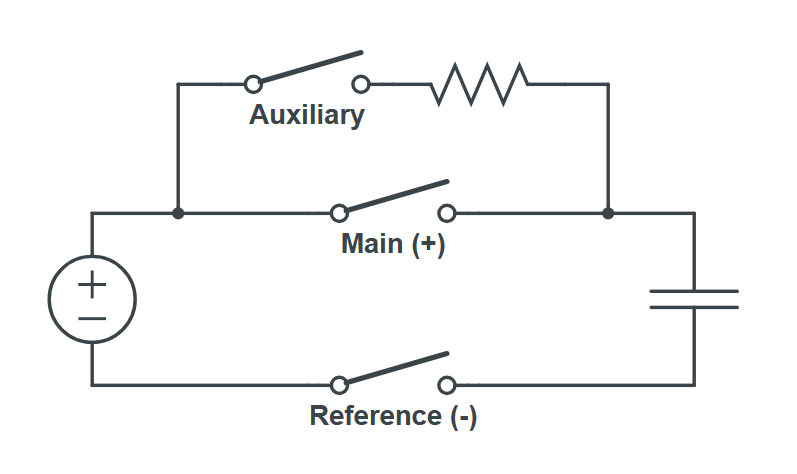
Hardware Layout
Precharge is a predefined device type in the controller that automatically handles the precharge logic and the closing of contactors, based on a voltage measurement or setpoint. A precharge device controls up to three contactors on a DC bus connection. The main and auxiliary contactors are required, the reference contactor is optional.- Main contactor: switches the positive line of the DC connection.
- Reference contactor (optional): switches the negative line of the DC connection.
- Auxiliary contactor: switches the precharge contactor, placed in series with a precharge resistor. It is used to limit inrush current during startup.
Voltage Source
The precharge logic requires a voltage measurement to determine when to start or stop the sequence. The voltage can come from two sources:- Setpoint (
status.voltage): a value written directly to the precharge device, for example by another device or a control script. - Analog measurement (
measure.voltage): a value forwarded from a connected analog measuring device viaanalogMeasurementAddressMap. When an analog address map is configured, this source takes priority over the voltage setpoint.
Precharge Sequence
The precharge device is always in one of the following states:- Open: all contactors are open. The device monitors the voltage measurement or setpoint and waits for the conditions to start the precharge sequence. The sequence starts when the voltage rises above
tresholdVoltage(and belowmaximumVoltage, if configured). IfbreakerFeedbackis enabled, a valid breaker signal is also required. - Closed reference*: the reference contactor is closed first. The device waits for
holdReferenceInSecondsbefore continuing (*only if a reference contactor register is defined in the address map. If not, this state is skipped and the device immediately transitions to the Precharging state). - Precharging: the auxiliary contactor is closed, allowing current to flow through the precharge resistor. The device waits for
prechargePeriodInSecondsto allow the DC link capacitance to charge. - Closed with auxiliary: the main contactor is closed. The auxiliary contactor remains closed for
holdAuxiliaryInSecondsto ensure a controlled transition before it is opened. - Closed: the auxiliary contactor opens. The DC bus is now fully connected through the main and reference contactors.
tresholdVoltage, exceeds maximumVoltage (if configured), the breaker signal is lost (if breakerFeedback is enabled), or the main or reference contactor feedback is lost (if the respective feedback options are enabled).
If contactor feedback is enabled and a contactor does not reach its expected state within 15 seconds, the precharge sequence is aborted and restarted from the beginning. If maxFeedbackRetries is configured, the device counts each such retry. When the maximum number of retries is reached, the device enters a fault state and requires a control.reset command before it can resume normal operation.
Manual Control
For testing purposes (for example, to verify the precharge configuration and contactor wiring), the precharge sequence can be controlled manually by writing commands directly to the precharge device:control.enable: manually starts the precharge sequence, regardless of the voltage measurement or setpoint.control.disable: manually stops the precharge sequence and opens all contactors.
control.reset to clear the manual enable/disable state and return to normal operation, where the precharge sequence is driven by the voltage measurement or setpoint.
Required Parameters
To add a precharge device, the following parameters are required.A unique identifier for the device.Example:
battery1_prechargeIndicates the type of device. For this type of device, it is always
precharge.Example: prechargeThe name of the device’s address map on the controller.Example:
battery1_precharge_address_mapIndicates whether the device is enabled or disabled. A value of true means the device is disabled, while false means the device is enabled.
The duration in seconds the device remains in the
Precharging state, with the auxiliary contactor closed, before closing the main contactor.Example: 10The duration in seconds the auxiliary contactor remains closed after the main contactor has been closed.Example:
2The minimum voltage in volts required to start the precharge sequence. While in the
Open state, the device waits until the voltage measurement or setpoint rises above this value before initiating the sequence. If the voltage drops below this value while in the Closed state, the device opens all contactors and returns to the Open state.Example: 700Optional Parameters
The following parameters can be added to digital input or output devices; however, they are optional and not required. These parameters provide additional functionality to the device.Enables feedback for all three contactors (main, auxiliary, and reference) at once. When set to
true, this is equivalent to setting mainContactorFeedback, auxiliaryContactorFeedback, and referenceContactorFeedback all to true.Indicates whether feedback is enabled for the main contactor. When enabled, the address map must contain a
measure.contactor.main register.Indicates whether feedback is enabled for the auxiliary contactor. When enabled, the address map must contain a
measure.contactor.auxiliary register.Indicates whether feedback is enabled for the reference contactor. When enabled, the address map must contain a
measure.contactor.reference register.Indicates whether the breaker feedback is enabled or not.
The maximum voltage in volts above which the precharge sequence will not start, or if already in the
Closed state, will cause the device to open all contactors and return to the Open state.Example: 760The duration in seconds the device remains in the
Closed reference state, with the reference contactor closed, before engaging the auxiliary contactor. Defaults to 3 seconds if not specified.Example: 5Indicates the name of the device’s analog measurement address map on the controller.Example:
battery1_analog_address_mapThe maximum number of times the precharge device may retry the precharge sequence when the contactor control and feedback do not match. When the limit is reached, the device enters a fault state and requires a
control.reset command before it is released. Defaults to -1, which allows unlimited retries. A value of 0 means no retries are allowed.Example: 3